Quilting, fabric and gardening are competing passions for me. I also can not bare to waste just about anything. Therefore, I love any project able to combine all of the aforementioned into one easy and cute project! The easy fabric string scrap planter pots do just that. Here is a brief tutorial of how I created these sweet scrap-busting and re-purposing planter pots.
Supplies:
- colorful fabric string scraps or fabric ribbons – mine are all various lengths by about 1/4 to 1/2 in in width
- Mod Podge Waterbased Sealer
- sponge brush
- fabric/craft scissors
- used plastic planter pot or recycled plastic container, such as yogurt tub
- Mod Podge Sealer Spray (optional)
- soil and small plant or seeds

Begin with a clean and dry plastic planter pot or recycled plastic container. (If you already had a plant in your container you would like to keep, gently slide it out of the pot for the project and set it aside while you work. You can place it back in the pot at the end of the project.)

Gather several complimentary and contrasting string scraps in a pleasing pallet. I used about eight shorter and three longer fabric strings for each planter pot. The shorter fabric string scraps will run vertically across the pot. The longer string scraps will wrap around the circumference of the pot. To make sure your scraps will fill the entire height and circumference of the pot, you could dry measure, or lay your strings out across and around the pot to make sure each will work. I didn’t really measure my string scraps. If I was short wrapping either direction, I just overlapped with an additional piece until they cleared the edge or connected around.


.
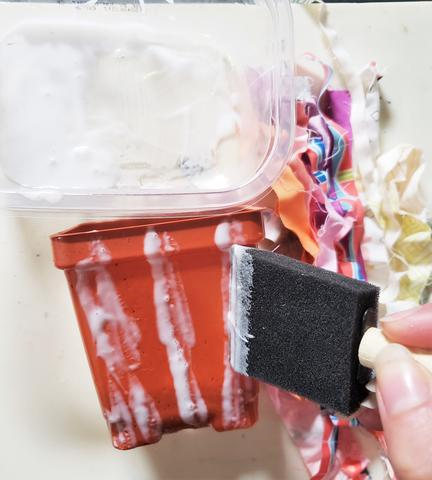
Once you have selected your fabric string scraps, apply approximately evenly spaced lines of Mod Podge vertically across one side of the planter. Line up the edge of your string scrap with the bottom of the planter edge and press your shorter vertical string scraps into the Mod Podge and smooth them flat. Any piece of the string scrap that hangs off of the top of the planter can be trimmed later and reused on another section.


Using your longer string scraps, apply approximately evenly spaced lines of Mod Podge horizontally across the planter pot, overlapping the vertical string scraps. again, press your longer string scraps into the Mod Podge and smooth them flat. When you reach the edge of the planter leave the length of the string scraps hanging over the edge. Continue wrapping the long string scraps around as you move to each side of the planter until you can overlap them.
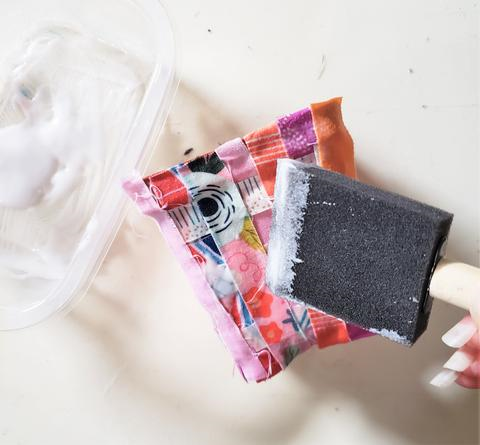
Apply the top layer of vertical string scraps to cover the still exposed plastic area in between the first layer of vertical strips by again applying Mod Podge and smoothing them flat. This application provides a faux woven look. Allow the planter pot to dry before coating in an additional layer of Mod Podge across the entire surface to seal down the string scraps. Make sure to smooth out any puckers in the fabric as you go. Again, allow the Mod Podge to dry. Seal with the Mod Podge sealant spray for an additional, long-lasting finish.
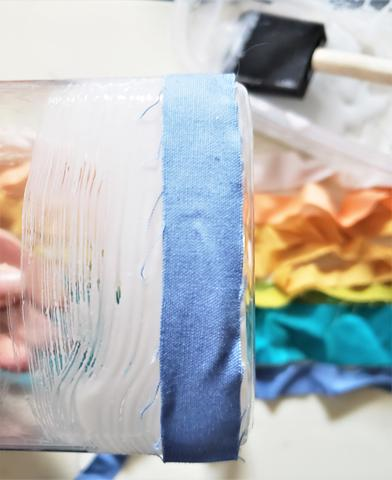
I also created a version of the string scrap planter pot using a recycled orange juice container with the top cut off. For this version, I chose an ombré assortment of fabric string scraps and ran them horizontally around the container. This version might be easier if you are choosing to do the project with young children. Follow all of the principles of fabric application and finishing as described above.

Finally, add a little soil and a plant to complete your cute String Scrap Planter Pot project! I think the planter pots would be an adorable hostess, teacher, or thank you gift you could create with your child. Make several, use up all your fabric string scraps or excess ribbons and create a fun tabletop garden combining your love of fabric, texture and plants. The fabric string planter pots would also make a great table decor for an outdoor party, bridal or baby shower this summer and could easily be coordinated with any thematic color scheme. Really, the possibilities are endless!


I hope you enjoyed this tutorial on how to make a fabric string planter. If you make a planter of your own inspired by my project, please leave a comment below or share a picture by tagging me on social media @laruedefleurs. I would love to see how you interpret the idea and how it worked for you! Happy planting! xoxo, Janice
Inspiration and resources are linked where applicable. All written work and photographs are original content and are copyright protected; kindly give due credit by linking back to my website if you use or share.
(©2019, Janice Bailor // laruedefleurs.com)