
Dark as night and mysterious as the moonlit path, today’s embroidery uses a cyanotype print background as the spooky foundation for some celestial stitching. Creating an embroidery scene from plain fabric may leave you confused as to where to even start. But beginning with a foundational background to work from can be a great boost to unlocking and inspiring a whole composition. In this tutorial, I am using a blue cyanotype print, a moon and a moth to create a gorgeous embroidery inspired by the night.
Creating the Cyanotype Background
Cyanotype is an extremely easy-to-access dye that only looks difficult to use. If you have a measuring cup, brush, and sunlight you are well on your way to an awesome hand-dyed fabric.


To create my cyanotype background, I first painted a large piece of muslin fabric with equal parts of the cyanotype solution. I used the Jacquard brand HERE. I lightly stretched and taped the fabric to a board so it couldn’t stain my floor or slide around, which made the application of the dye easier.
After my dye air dried overnight in a dark room, I cut off an approximate 8 by 10 inch section of the fabric. The rest of the pre-dyed fabric I will store in a dark brown folder in a drawer away from all light sources. This should protect the dye for future use (fingers crossed).
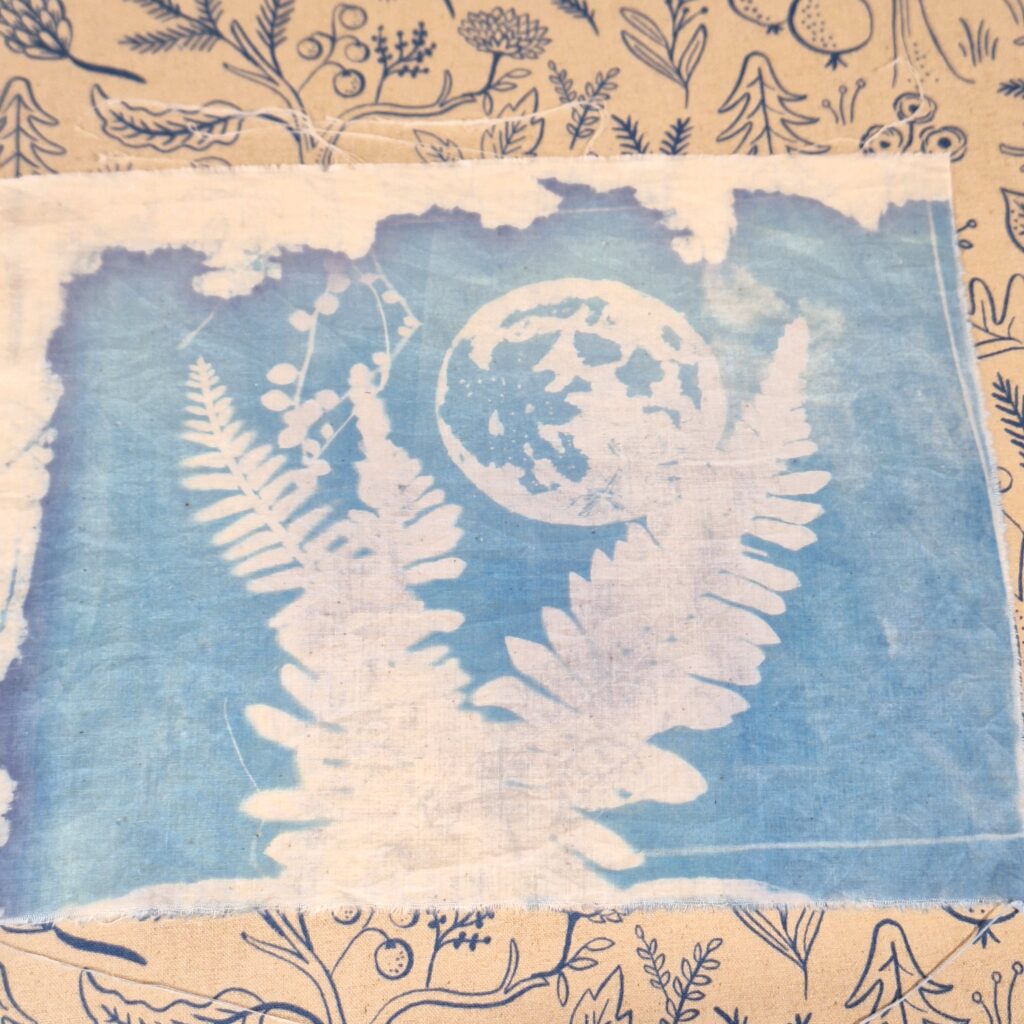
Then I arranged several faux fern leaves and a moon image on the fabric rectangle and exposed it for three minutes under a UV light. You can expose your image outside on a bright and high UV day, but I have a light to cut down on that variable. I created the moon image by simply using a piece of plastic packaging and taping it over an image of the moon on my computer. Then I colored over all of the light areas with a Sharpie marker (remember, the cyanotype exposes what is covered, so you have to think of what you want to have appear light and blocked out) to create my image. Low tec- you can do it!
Finally, I rinsed the exposed image in room-temperature water with a splash of peroxide to help set the dye. Then I patted it dry and left it to fully dry in a dim room.
Inspired by the Night
The cyanotype creates a beautiful watery blue color and slightly translucent areas of the images. The combination makes me feel as though you are walking through the forest or garden on a moonlit night. Not everything is clearly in focus, the plants and path awash in a soft blue glow.
Leaning into that feeling, I again referred to the Mystical Stitches book by Christie Johnson to find an image of a moth that could fly through my night composition. Of course, the book did not disappoint!

I lightly sketched out a moth on the background right under my moon. I arranged the ferns to frame the moon image, and I also want to keep the highlight on the moth as well. These are my focal points, so I am clustering them near each other in the frame of the other elements.
I used a selection of contrasting threads and a liberal amount of brown to create my moth. The soft, glowing orange and peach tones work well on the blue background. Because yellow and oranges are across from blue on the color wheel, to the eye they contrast and pop against the blue. Brown, also being a warm tone and contrasting with the coolness of the blue, works well as a foundational neutral here.


I used a satin stitch to fill in the sketched month shape. A satin stitch is a great filler stitch where you lay one thread right next to the other, maybe varying the lengths of the stitch for interest. As I worked to fill in the wings, I went in an undulating length down along the side of my moth’s body with the golden threads. Then I tried to mirror on the left what I had done on the right to create the symmetry of matching wings. I then layered in the brown and peach threads the same way. Finally, I filled in the soft lavender dots to complete my moth wings.
Herbaceous Touches
Simply adding one moth to the composition would seem unbalanced, so I wanted to add more stitched elements. However, I didn’t want to distract from my focal moon and moth elements, so I added a few light areas of herbaceous vines and plants.


Again, I added the stitches in the general arrangement of the fern leaves I had exposed to the background of the canvas. I used the stem stitch, variegated feather stitch, back stitch, and chain stitch to create four different vines and branches framing the moth. Along with the V-shaped placement of the stems, I also used one bright and one dark green selection of threads to balance the color on either side of the center and keep the focus in the middle of the composition.


To balance out the very colorful moth, I wanted to bring a touch of color into the plants as well. I added a dark coral small berry to the stem grouping on the left. I used a French knot and two small stitches in a v shape to create berries or small buds at the end of the dark stem. On the right side, I again added a pop of color to the dark stem. This time I opted for butter yellow flowers using the lazy daisy stitch.
Moon and Moth
The whole piece came together in just a few hours! From dying to stitching, each element brought a unique layer to the composition. I do feel it reflects the moonlit garden, don’t you agree?


My suggestion for working with this type of embroidery project is to allow the background to do some of the heavy lifting for you. Here the dyed elements help create a lot of interest before I even added stitches. Also, choosing colors that popped against the dyed background made sure that all of my hard-stitched effort was also a focal point!

Watch it All Come Together
Would you like to see my work in real(ish) time and more detail? I filmed a process video for the Moon and Moth Cyanotype Embroidery. You can watch it here on YouTube!:
Create with Me!
If you join in with the videos or create a cyanotype and embroidery project similar to the one above, don’t forget to share your work with the La Rue de Fleurs community by tagging me on IG @laruedefleurs and using the hashtags #cyanotypeembroidery and #laruedefleurs. I hope you’ll join me and have fun using creative stitches to create and enchanting embroidery inspired by the night!
Stay creative friends, Janice
Inspiration and resources are linked where applicable. All written work and photographs are original content and are copyright protected; kindly give due credit by linking back to my website or source website if you use or share.
(©2023, Janice Bailor // laruedefleurs.com)