The Expanding Stars Quilt Along with Emily Dennis of Quilty Love is in full swing, and I along with all of the other participants over on Instagram have selected and begun cutting our fabrics for our quilts. After reading over the pattern several times during the size and fabric selection process, I had the idea that the expanding star might also look great as a pillow. Here I am sharing how I made an expanding star pillow from the popular Quilty Love pattern and how you can make one too! This could be a great compliment to a larger quilt, or a fun way to extend your pattern for smaller gifts.
To make the pillow, I followed the Expanding Star pattern directions for cutting and assembly for the baby sized quilt. Out of respect for the pattern designer, no specific measurements will be shared, but rather I will be explaining the adjustments I made to create a pillow size, which is not included in the pattern options. I encourage you to grab the Expanding Stars pattern, as it is wonderfully done and well worth the price and opportunity to support a super creative and ever-giving member of the quilt community.
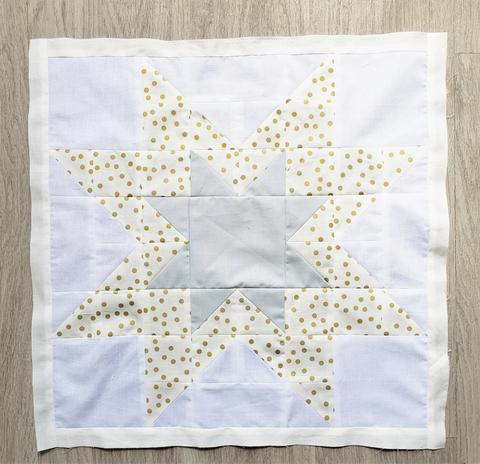
Firstly, I cut the A and B fabrics as directed in the pattern, but I cut only the amount of C fabrics needed to go with the B fabrics. I also cut four blocks the same size as the center unit, and four rectangles to fill in between the inner and outer star points from my C fabric to complete the background. Again, assembly is the same for all of the fabrics except C, so I proceeded to follow the pattern directions for making the half-square triangle units. Then I arranged all of my blocks as directed by the pattern instructions, simply filling in with the larger blocks at the corners and between the star points.

Directions and assembly for the Expanding Star pattern are well written, as you would expect from Quilty Love, and even with my modifications assembly of the pillow size only took a couple of hours from cut to finish. I added a little extra band of fabric around the exterior of the expanding star to bring my pillow up to a standard pillow form size of 20in square.
If you wanted to stop here, you definitely could. The pillow would be a great compliment to a larger bed or throw quilt. However, I had another idea to try! Since I had made my star so neutral, with light gray, cream and gold dot, and plain white, I decided this would create an interesting background to try a little appliquè idea I had been thinking about recently. Before adding the floral appliquè, I made my quilt sandwich using up some off-cuts of batting and a not-so-loved print for the backing. I find making pillows is a great time to use up fabrics that are not your style anymore, as it will be inside the pillow and not show. Then I quilted the pillow along the natural grid made by the piecing using a simple white thread.
To make the floral appliquè, I used a hand drawn leaf and petal template I had made previously. Draw yourself some template petals on a piece of scrap card approximately 2in long and one smaller one approximately 1in long in a pointed oval shape to create petals and leaves. Remember, petals are created by nature and rarely perfect, so you don’t need to be either! Next, I hit my scrap bin for a few shades of the same colors to be used as flower petals. Using a few shades creates interest and depth. I had quit a few bits of Kona Sangria and Art Gallery Grapefruit with other complimentary lights and darks making it easy to chose that combination for my flower petals. For the leaves, I chose some small mystery aqua scraps and the last little bit of my favorite Art Gallery x print from their Littlest line.
To make the leaves, trace your template on the wrong side of your fabric. I use featherweight interfacing to help make my appliquè bits so I do not have to individually turn under all of the raw edges. To do this, place right side down (outline up) onto the interfacing and completely sew around your petal shape. Cut the petal out. Right now there is no way to turn the fabrics right side out, but -here’s the best part!- use your fingers to pull the interfacing away from the cotton and make a slit into the interfacing using your scissors. Bring your cotton fabric through the slit, turning all of the right side of fabric out. Now all of the raw edges are inside the interfacing pocket and turned to the back without having to turn everything down by hand. Use a chopstick or similar to poke out any small points and press your appliquè flat.

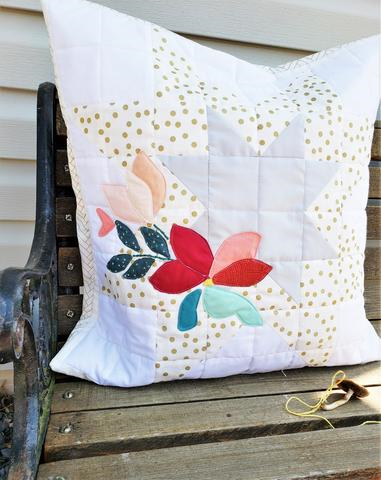
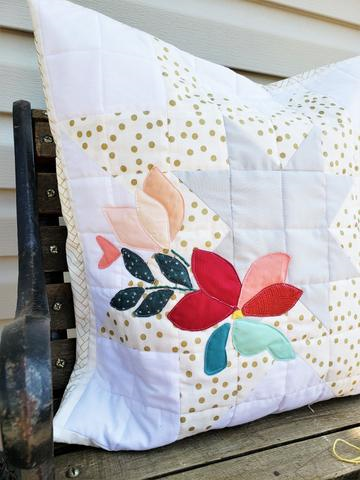
Then use your various petals to arrange a floral spray across one corner of the Expanding Star pillow top. I love the cut paper work of Paige Taylor Evans, and I find great inspiration from her projects which translate really easily into fabric appliquè. Lay your petals out in a way that suggests flowers and leaves in an effortless spray, or loose scattering of flowers. After you are happy with the arrangement, tack the petals in place and top stitch them to the pillow top. I used white thread here, but I have used matching thread in the past, either is fine, just a matter of taste and effort! When I completed applying the florals, I added a small amount of details with embroidery thread to connect the leaves and add a center to my large flower cluster, enhancing the overall effect.

To complete the pillow, we need an envelope pocket back. I find using a 24in by WOF (width of fabric) cut of one fabric works most easily to complete this project. I just lay out a piece of fabric that goes about 3/4 of the way across the pillow and is the complete WOF. Then I iron over one straight edge, rolling the raw edge over and top stitching down to make a clean edge the entire way across the WOF. Then cut the fabric apart down the center and align it right sides together with the pillow top, one raw edge at one end and one raw edge along the other, allowing an inch or so overhang of the pocket fabric. Both of your pieces will overlap across the middle of the pillow, creating the pocket. Then sew a quarter inch seam all the way around the pillow top, attaching it to the pocket fabrics. I then go back around the fabric with a zigzag seam to finish and reinforce the attachment. You could also use a serger to finish the edges, if you have one. Trim away excess fabrics and cut the corners to decrease bulk. Turn everything right sides out and poke out the corners to finish.

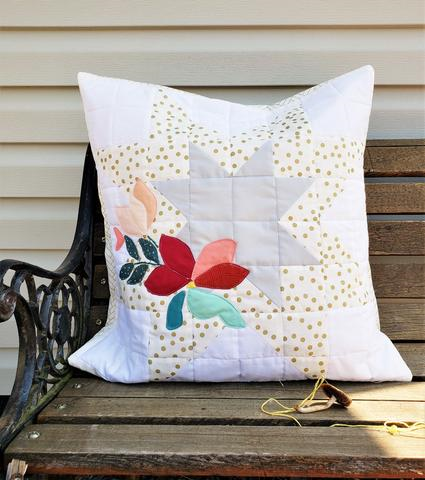
Ta-Da! you now have a lovely Expanding Stars Pillow to go with your quilt! These pillows would make a great addition to your home or as a thoughtful gift. You could take them one step further and add the appliquè as I have done here, or keep them simple using only the block design.
I hope you enjoyed this look into how I made my Expanding Stars Pillow Hack with floral appliquè. If you make a pillow of your own inspired by my project, please leave a comment below or share a picture by tagging me on social media @laruedefleurs. I would love to see how you interpret the idea and how it worked for you! Happy pillow making! xoxo, Janice
Inspiration sources are linked where applicable. All written work and photographs are original content and are copyright protected; kindly give due credit by linking back to my website if you use or share.
(©2019, Janice Bailor // laruedefleurs.com)