Macramé, that fun ’70s hobby experiencing a vibrant return at the moment. Made from rope woven together in a series of alternating knots, macramé projects are textural works of art for the wall. Perhaps most traditionally, macramé is used to make decorative, yet functional plant hangers for the home. Several of these beauties caught my eye recently as a solution to a growing indoor plant collection. I love plants, but I also have a curious cat whom I don’t want to become ill. Therefore, macramé plant hangers seem like a great solution to keep plants out of kitty’s reach in a stylish way. However, I don’t have rope. I don’t really want to buy rope. I am willing to make rope though, specifically rope from my fabric scraps of which I have many!
These are primarily pieces that have been trimmed off of quilts or from when I straighten edges of off-the-bolt fabrics. I never want to waste them or throw them out (I paid for that fabric and I hate waste), but after a while, you become overrun. I, like a majority of quilters I assume, am always looking for fun projects to use up these little bits and I am happy to share this idea here.

To get started, I decided to edit my scraps down to a fairly restrictive color scheme just to keep the rope looking more cohesive. I sorted through my bin of gray, green and aqua scraps looking for thin strips of fabric about 1 3/4in. wide by whatever their length. I trimmed any that needed to be straightened and gave the majority of them a good press to get out wrinkles from a long season being jammed in the scrap bin.
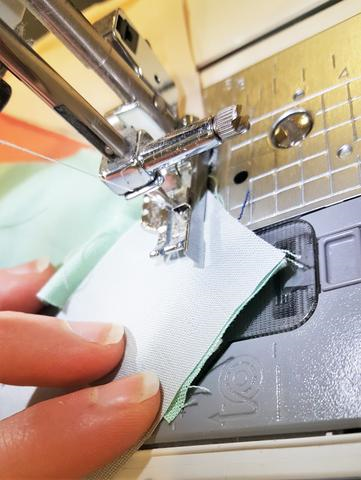
Next I sewed all of the strips together the way I would binding for a quilt, on the diagonal to spread out the seam bulk. I can’t specifically remember when or where I learned the technique I use for making binding strips or binding my quilts, but I’m almost positive I learned from some Fat Quarter Shop YouTube tutorials. Here’s a link to their “Everything Binding” playlist, so check that out it you’re interested in learning more.
After I sewed a few pieces together I thought I’d better check how much of these “ropes” I would need and I quickly did a Pinterest search for simple macramé plant hangers. I decided to go with a tutorial from Craftiosity, a monthly craft subscription service that happen to put up excellent how-to videos on the projects they sell. The number of ropes needed for the project was eight pieces at 15ft and two pieces at 5ft; that’s 130ft of handmade “rope.” Oh my, this was going to be a lot of piecing and pressing, but I also hoped it would make a good dent in the scrap bin so it would be worth it!

After sewing the strips together, press them all in half, creating a crease down the center of the strip. Then press each edge into the center to meet at the crease you created, making four even creased sections of the strip. Then, making sure the outside raw edges meet at the center crease, fold the strip in half and press it all together so the raw edges are completely enclosed in the center of the strip.

Take the eight 15ft sections and two 5ft sections of sewn and pressed strips over to the sewing machine and sew (ahem, forever) down the edge with the open folds to close everything up. Ta-da! 130ft of scrappy fabric cord!
Now it’s time to grab your tablet or laptop and follow along with the Craftiosity Macramé Plant Hanger How To DIY Tutorial. I bought wooden rings from Hobby Lobby to use in hanging my macramé, but you can get these at any one of your favorite craft stores. Now to just knot my little heart out!

I never actually tried macramé before this project, so I can’t honestly say whether it is easier with plain rope or not, but I did not have any significant trouble using the scrappy fabric rope. I did unpick and re-knot a few sections because I thought they looked sloppy and didn’t get the double helix look in the tutorial. Once I adjusted the tension on the knots, it started to come together. Honestly, I probably would have had that problem with whatever material I had used, simply because there is a learning curve to all new projects. I will say the fabric cord held up to not only the original knotting, but also a couple of do-overs without any problems.


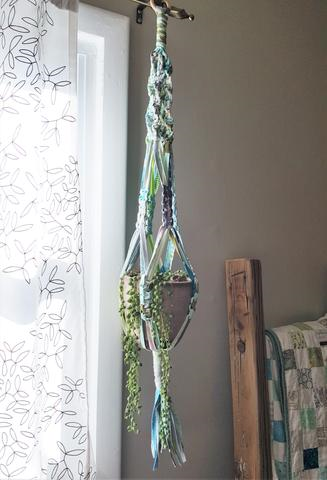
After tying off at the bottom of the macramé per the instructions of the tutorial, I trimmed all of my “rope” to create this charming tassel for a cute finish to the plant hanger. I popped in a pot and took a few pictures of the finished project before finding it a forever home in the house.

The macramé plant hanger tutorial from Craftiosity was easy to follow and really took less than a half hour to complete, even with re-knotting a few parts. I also watched a few other macramé tutorials like these from Emily Faith, a Canadian macramé artist.
Honestly, the longest part of the process was making the scrappy cord. If you did this project a little bit of cord at a time as sort of a leader and ender project, that would probably be most ideal. Again, I am happy to work through the scraps and find inventive ways to use them up, so it is worth my time and effort if it fits with that value. I get immense pleasure when I see these otherwise forgotten pieces in my home, and it truly fits with the tradition of quilting to “leave no scrap behind.”
Overall, I enjoyed this project. I did make somewhat of a dent in my scraps and I got a cute home decor item that solved a problem in my home. By choosing a tight color scheme with the scraps, I was able to make a plant hanger that matches with a similarly scrappy checkerboard quilt we use in our living room. I love working toward a look in my home that is both collected, yet curated, so this totally fit both of those criteria.
I hope you enjoyed this DIY rundown of how to make a scrappy fabric strip macramé plant hanger. If you make one of your own, please leave a comment below or share a picture by tagging me on social media @laruedefleurs. I would love to see what way you interpret the idea and how it worked for you. All written work and photographs are original content and are copyright protected; kindly give due credit by linking back to my website if you use or share.
Happy knotting! xoxo, Janice
(©2019, Janice Bailor // laruedefleurs.com)