
If you’re like me, the reason you are drawn to quilting is because of the endless possibilities to play with beautiful bits of fabric. However, having a large stash of fabric can quickly become burdensome, and possibly guilt-inducing. Today I would like to focus on how I shop my stash first when creating a bundle of fabric to use for a quilt project. In my Build Your Best Bundle series at the beginning of each feature quilt project, we will walk through how to pull fabrics from your stash to create a well-rounded and personally curated bundle of fabric to work with. We will talk about how to create a narrative or theme to guide your choices, pull fabrics for tone and texture, create a story through your fabric choices, and finally, how to pull in your unique signature and a pop of the unexpected.
Step One: Find Your Theme
Should you start a quilt project first with the pattern or the fabric you want to use? It is a bit like asking whether the chicken or the egg came first. It’s a bit of a back-and-forth. Sometimes, I know what the desired outcome of the project should vaguely look like. Helping lead me to a pattern I think would work well to achieve that vision. Sometimes, I am just dying to use a certain fabric, so I start there and let that influence all of the choices moving forward.
Generally, however, each time I start a new quilting project, I create a small story in my mind for the overall quilt project. I create a working title, a guiding line to help focus my tale in fabric. I choose a theme or narrative that I refer to again and again as I pull the fabrics and even select the pattern. Usually, the choice is based on either the final home or recipient of the quilt, or if it is for my shop, some other story I would like to explore.
For example here, I want to make a new throw quilt for our recently remodeled basement media room. My children are teenagers now, so we are creating a more mature spot for them to have their video games, computer games, arts and crafts, and hang out with friends. We are really leaning into the dark vibe of the windowless room and creating a media space complete with deep emerald green built-in bookcases and a desk nook. Moody, classic, and a slight woodland vibe with the wood-paneled walls are the decor of the space. The quilt does not have to match the room, but I want it to feel like it belongs there. Therefore, the guiding colors and vibe of my quilt will be deep greens, blues, greige, and woodland as well.
The name of the paint the kids and I selected for the room is “Alpine Trail” by Benjamin Moore. AGH! I could not have thought of a more perfect title myself! As I pull fabrics for my quilt, I will refer again and again to the title “Alpine Trail.” Some things the title will help me keep in mind are:
- What colors coordinate with the paint?
- I will focus on the deep green and other choices with blue undertones
- What type of images go with the theme of “Alpine Trail?”
- I will choose patterns with woodland images, pine trees, and ferns
- How do I showcase the woodland theme in a mature and sophisticated way?
- I will choose patterns that have limited animals and are more classic, geometric, or artistically inspired

Step Two: Choose a Pattern
Once you have a guiding theme or narrative, it is time to choose a pattern that will showcase and reinforce it. I absolutely love making scrappy-looking, print-heavy quilts. Try as I might, I just can’t keep it simple! The advantage of this, however, is that I can generally make a lot of different fabrics from my stash work and rarely have to shop for a ton of fabric for one project.
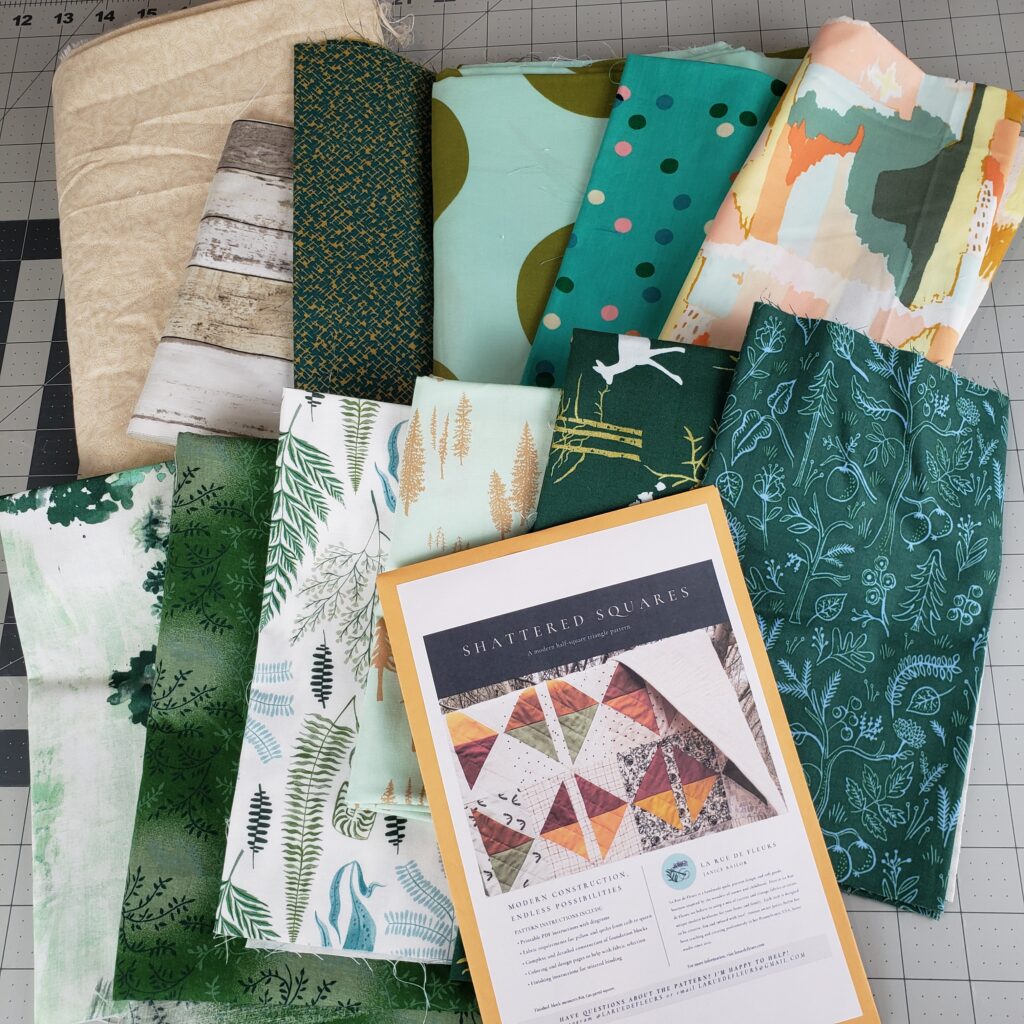
For this quilt, I knew I wanted a throw size that would allow me to play with and incorporate a lot of small quantities of fabric so I could shop my stash. This is a project for the media room and children after all. Those ideas led me to my quilt pattern, Shattered Squares, which uses just 6.5″ squares and looks great scrappy! I also happen to have just been gifted several large cuts of tone-on-tone tan/cream backgrounds that I felt would work perfectly to offset all of the colorful “shattered squares.” Lucky me!
Step Three: Shop that Fabric Stash
Okay, the best part! Shopping our stash for the fabric to make our quilt! I always, always take a look through what I have first before I even consider going off to buy something new. I think this keeps me on track to use up what I have already purchased. Even though I do buy fabrics from time to time just because they are irresistible, they tend to get used fairly quickly with the shop your stash philosophy.
To begin, keep in mind your theme, project title, or narrative as discussed. I start with the colors I want to use first. I keep my fabric roughly sorted by color, so it is easy for me to head to that cubby and take a look through what I have. For example, with “Alpine Trail,” I literally took the paint chip over to my shelf and pulled down everything with a similar blue-green or emerald color.
Next, I look for prints that are on theme. What has a forest motif? Ferns? Woodland print or vibe? I pull all of those options out and lay them across my table. For my quilt, I choose one or two main fabrics that are the whole color scheme and theme, then I work out from there. Think of those fabrics as the main characters. They are the stars, and all of the other fabrics radiate out and support those feature prints.
Here are my “stars” below on the right. The Rifle Paper Co. forest print in powder blue and emerald is 100% on theme! The Brambleberry Ridge print in emerald is also perfect, as is the lighter-tone pine print from Art Gallery Fabrics.

After I have chosen the stars of the quilt, I move on to the supporting cast. The supporting fabrics continue the theme but in a slightly different and often more subtle way. Here the supporting fabrics all relay the woodland fern theme in different scales and saturations of color. The color tones are plays on those of the main fabrics as well, helping to spread the overall color story throughout the fabric bundle in new ways.
Step Four: Fill In with Supporting Prints
As in our analogy of the movie cast, not every member of the performance can be the star or you would never know who to pay attention to. So it also goes for our fabric cast. We have chosen our stars, the fabrics best at telling our color story and theme. We have chosen the next their down supporting cast who reinforce the theme in a more subtle layer of prints, but with the same colors and tones are our main fabrics. Now it is time to introduce some of the background players. These are the fabrics that continue to enhance our theme and color story, but are more existing for our main and secondary fabrics to play off of.
For this grouping of fabrics, think about texture and geometric prints. They should have the same color tones and feel as your main fabrics, but with a slight twist or personality of their own. For my background cast of fabrics, below, I have a texture print, a watercolor-inspired tree print, and several scales of dot.

Because the driving narrative of my quilt is sophisticated, woodland and alpine trail, I do not want to choose any fabric that would read as too juvenile. The texture print introduces some layers of color but really doesn’t tell its own story. Perfect for a background fabric. The same can be said for the dots. They mix in the colors found in the other fabrics, but really don’t have their own narrative. Lastly, the watercolor trees blend the line between the supporting fabric and just a background. It has a subtle story to tell, but it certainly relies more on the main fabrics to make sense.
Step Five: Add a Pop of the Unexpected
In every great tale, there is a catalyst. Something that makes the main character work or push and pull against. Fabrics and color also need to be offset against their contrasting partner for a bit of push, pull and interest. Here I have introduced a pop of contrasting pink in the small confetti dot print and a bit more intensely in the watercolor swatch print. The pink is opposite those cool teals, greens and aquas on the color wheel. The contract is exciting and interesting to your eye. By adding just a sprinkle of it in two prints, the push and pull against our main colors has a bit of interesting tension for the composition, but not enough to compete with our main color story.
Step Six: Round It Out with a Subtle Background
Lastly, we need a background that sets off all of our fabrics and will highlight the shape of our quilt blocks. For my background here I have chosen a soft tonal print in a tan. The tan will coordinate with the couch in the media room and help blend the colors of my furniture and walls throughout the project. The print is also a subtle nod to the theme again, with a pine frond print. The color is very soft and complimentary to the rest of my fabrics and supports them without competing. And the best part is I have loads of it to finish all of the backgrounds to all of the blocks for the quilt!

In Conclusion
Keep in mind the narrative of your quilt when you are building your best bundle. What is the story you want to tell and what is the final destination of the quilt? Allow those questions to be your guiding light as you look through your fabric options. If it doesn’t feel right, learn to trust your instincts. Over time this is what allows your true signature style to develop into your very best work.

Follow Along Via Video Chat
How do I select fabrics for a quilt project? Join me in this video for a deep dive into my philosophy and thought process on building my own fabric bundle completely from my stash! In this video, we will discuss how to shop your own fabrics and #buildyourbestbundle to work with throughout the month of March 2023 as we create the Shattered Squares Quilt Pattern.
Purchase the Shattered Squares Quilt Pattern, support my work, and play along: https://www.etsy.com/listing/785701407/modern-quilt-pattern-shattered-squares?click_key=d6c3344e6280104ff2fe8d4f0c01ae2ba5afb97f%3A785701407&click_sum=fa0a55b2&ref=shop_home_active_10&pro=1
Print out the schedule of events and top tips for the March 2023 SHattered Squares Quilt-a-Long:
I hope you’ll join me all month long as I work my way through the quilt and share my process. If you’d like to keep up, don’t forget to like, subscribe, and sign up for my newsletter for the latest posts. If you’d like to play along with one of your own hand-curated fabric bundle, grab the Shattered Squares Quilt Pattern HERE, which will be on sale for a limited time.
If you join in with the Shattered Squares Alpine Trail series or create the Shattered Squares Quilt on your own, don’t forget to share your work with the La Rue de Fleurs community by tagging me on IG @laruedefleurs and using the hashtags #shatteredsquaresquilt and #laruedefleurspatterns. I hope you’ll join me and have some fun with telling your tale in fabric!
As always, thank you for reading, and stay creative, friends!
Inspiration and resources are linked where applicable. All written work and photographs are original content and are copyright protected; kindly give due credit by linking back to my website if you use or share.
(©2023, Janice Bailor // laruedefleurs.com